


If you've started tinkering with Home Assistant, you've likely come across HACS - the Home Assistant Community Store.
Home Assistant HACS opens up a world of integrations, apps, and themes created by the Home Assistant community.
But what exactly is HACS, and why should you use it? This guide will cover everything you need to know about HACS - from installation and configuration to recommendations and troubleshooting. Let's dive in!
What is HACS in Home Assistant?
HACS stands for Home Assistant Community Store. It's a way to easily discover, install, and manage third-party repositories for Home Assistant.
Without HACS, installing custom integrations usually involves manually copying files or using Git to clone repositories. HACS simplifies this process by detecting when new versions of repositories are available and allowing you to install, track, and upgrade them right from the Home Assistant front end.
HACS is created and maintained by the Home Assistant community. It serves as a central hub to share repositories that expand what's possible with Home Assistant.
Why Use HACS?
Here are some of the key benefits of using HACS:
Simplified installation - HACS provides a UI to browse and install custom repositories from within Home Assistant. No more fiddling with configuration files!
Easy upgrades - HACS automatically checks for new versions of your installed repositories and lets you upgrade with a single click.
Discovery - Browse and search the HACS repository catalog to find custom integrations, apps, and themes to enhance your setup.
Goodness check - Repositories go through a submission process to get listed in HACS, giving you confidence in their quality.
Time savings - Spend less time hunting down repositories on GitHub and more time using them!
How Does HACS Work?
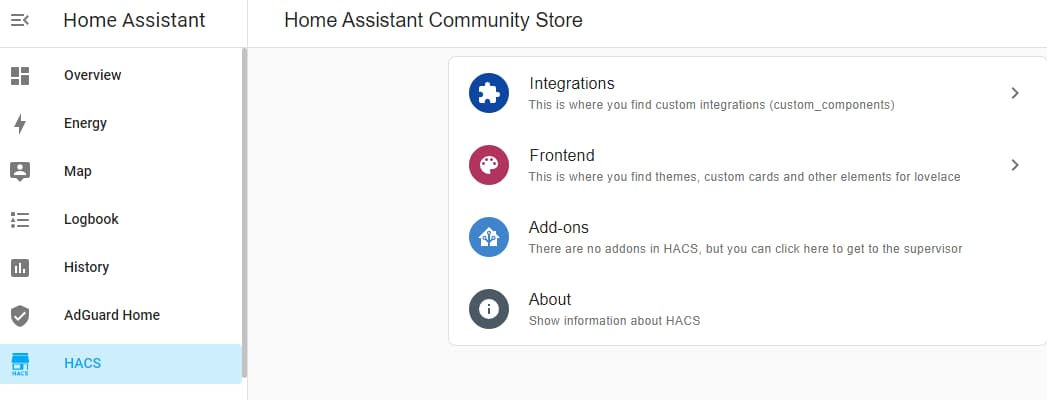
Behind the scenes, HACS is communicating with GitHub to index public Home Assistant related repositories. It categorizes them into:
Integrations - Customize Home Assistant with new platforms, sensors, etc.
Applications - Frontend apps that provide functionality through the Home Assistant UI.
Themes - Custom Lovelace UI themes and extra resources like icon sets.
When you first run HACS, it indexes all these repositories to make them available through the HACS UI. From there you can browse, install, and manage repositories without ever leaving Home Assistant.
HACS installs repositories by placing the correct files in your Home Assistant configuration folder. For example, an integration's .yamlconfiguration files would go in /config/custom_components during installation.
To keep repositories up to date, HACS uses a GitHub API to check for new releases. Whenever an upgrade is available, HACS will notify you in the UI.
Home Assistant HACS Installation
Ready to get HACS up and running? Here's how to install it:
Prerequisites
HACS has a few requirements before installation:
Home Assistant version 2023.6.0 or newer
Access to the Home Assistant configuration files
HassOS users - SSH add-on installed (such as Advanced SSH & Web Terminal) or direct access to the HassOS console screen
Manual Installation
To install HACS:
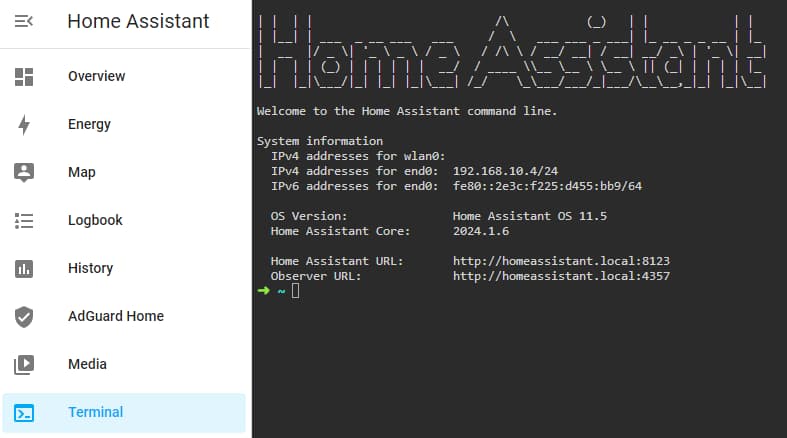
Step 1 - Open a terminal session inside Home Assistant.
Installing HACS on Home Assistant operating system
Open the terminal within an addon like Advanced SSH & Web Terminal
Installing HACS in a Docker Container
Open a terminal to the Docker host then run:
docker exec -it homeassistant bashInstalling HACS on Home Assistant Core
Open a terminal then switch to the user that is running Home Assistant
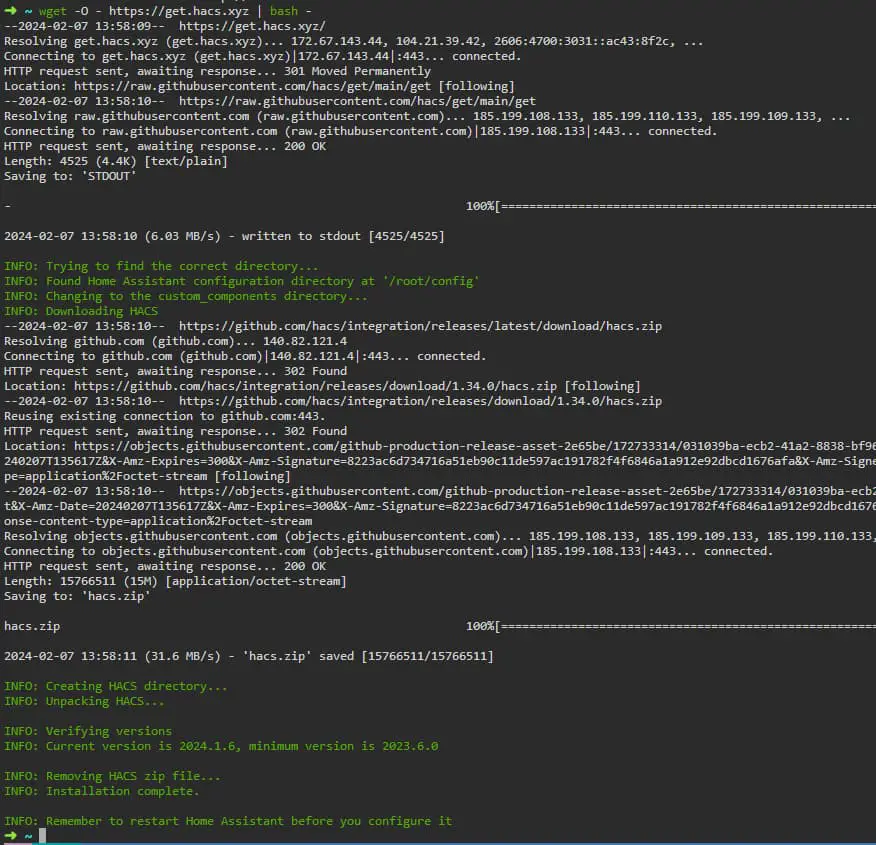
Step 2 - Download & Install
Run the following command on the terminal screen
wget -O - https://get.hacs.xyz | bash -The command will download and execute the installation script automatically. Once completed the screen should look similar to the image below.
Step 3 - Restart Home Assistant
Restart your Home Assistant instance, this can be done from within the Home Assistant UI by going to Settings > Restart Home Assistant.
If your Home Assistant instance is running as a container, simply start and stop the container.
Step 4 - Configure HACS
Open the Home Assistant UI then hold down CTRL and press the reload button in your web browser. This will force refresh the Home Assistant UI to clear the cache so we can see the HACS addon in the next few steps.
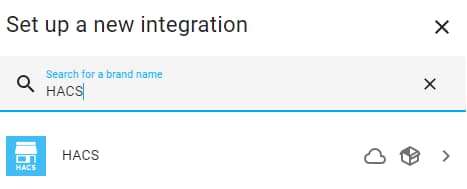
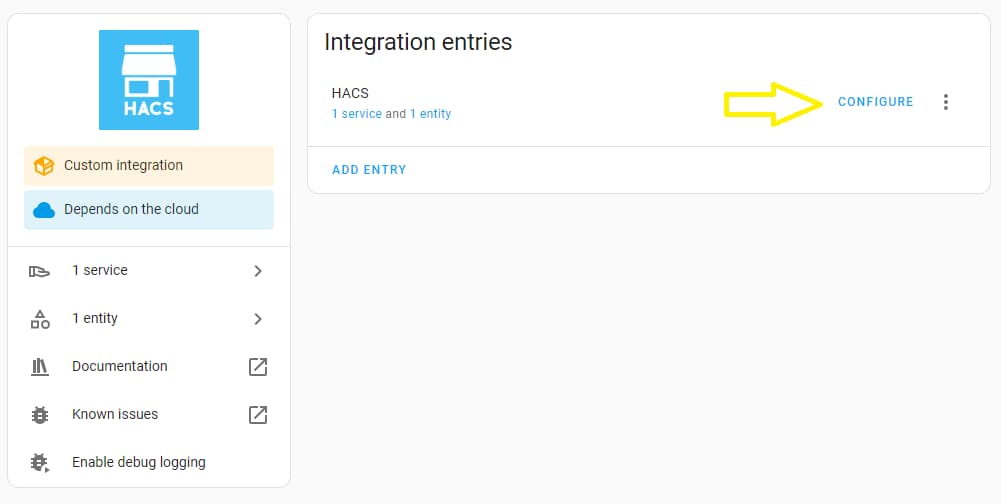
Open Home Assistant UI then go to Settings then Devices & Services.
Click on Add Integration and search for HACS
Click on HACS then wait for the following acknowledgment screen to appear.
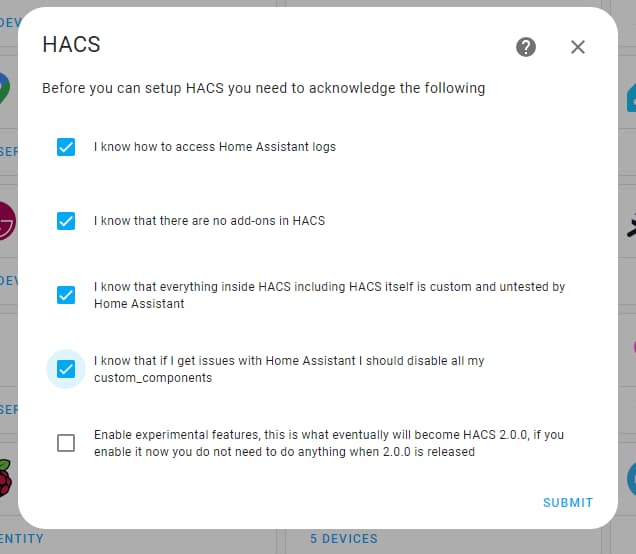
Tick the first 4 boxes to confirm and optionally tick the last box to confirm you'd like to enable experimental features then click submit.
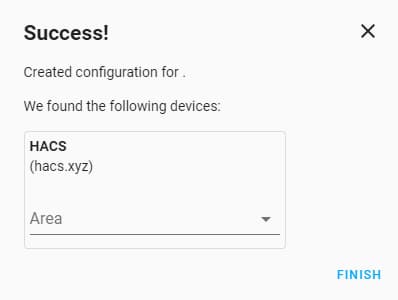
Follow the steps that show up and ask you to authorize HACS via Github (Github account required).

Once authorized you will see the following success screen, click Finish and HACS is ready to use.
Integration Configuration
There are a few key options to configure:
Categories - Choose which repository types HACS will index. Start with at least "Integration" and "Appdaemon".
Add custom repositories - Enter a GitHub repository URL to include repositories not listed in HACS by default.
Enable experimental features
These configuration options are found by browsing the addon configuration page.
With that, HACS is installed and ready to start managing your custom Home Assistant content!
Using HACS
The real magic happens once HACS is installed. Here are some tips for getting the most out of it:
Browsing Repositories
Use the HACS menu in the Home Assistant sidebar to browse available integrations, apps, and themes. You can filter, search, sort, and explore content.
When you find an interesting repository, click on it to view details like ratings, description, and installation instructions. This makes it easy to evaluate if it's a good fit.
Installing Repositories
When you're ready to install a repository, click "Download" on the details page.
For integrations and applications, HACS will automatically download and place the needed files. The repository will appear at the bottom of the HACS panel to indicate it's installed.
Note
For themes, you'll need to navigate to Settings > Dashboards > Resources to find and enable the theme after installing.
Upgrading Repositories
HACS makes it simple to keep your repositories up to date. Any installed repository with an available update will have a dot indicator next to it.
To upgrade, click the repository and you'll see a prompt to download the latest version. HACS will fetch the updated files and replace the existing repository.
You can also use the "Upgrade All" option to update everything at once.
Uninstalling Repositories
Need to remove an installed repository? Just click the "..." menu and choose "Uninstall".
This will remove all the repository files from your Home Assistant configuration folder.
To uninstall everything, there is a "Uninstall All" option available too.
HACS Recommendations
With so many repositories available, here are some suggestions to get you started:
Must-Have HACS Integrations
Google Calendar - Sync your calendar events and show them in Home Assistant.
Google Drive Backup - Back up your configuration to Google Drive.
Alexa Media Player - Control your Alexa devices.
Helpful HACS Apps
Lovelace Swipe Navigation - Add mobile style swipe navigation between views.
Layover Card - Display cards as a popup overlay.
Mini Media Player - Compact media player card.
Useful HACS Themes
Dark Mint - Clean dark theme with mint accents.
Midnight - Dark theme with bold colors.
Slate - Clean and minimalist dark theme.
There are many more great options to discover - browse HACS to find ones tailored to your use cases!
HACS CLI Commands
For advanced users, HACS can be managed through the command line using hassio ha hacs. Here are some useful commands:
Checking Repository Status
hassio ha hacs statusLists installed repositories and their current version. Helpful to see if anything needs updating.
Upgrading All Repositories
hassio ha hacs upgrade_allUpgrades every installed repository to the latest version. Much faster than upgrading individually in the UI.
Uninstalling Repositories
To uninstall a specific repository:
hassio ha hacs remove [repository]Or to uninstall all:
hassio ha hacs remove allTroubleshooting HACS
HACS generally works smoothly, but here are some troubleshooting tips for common issues:
Update Issues
If repositories aren't updating properly, try restarting Home Assistant and running hassio ha hacs upgrade_all to force an update check on all repositories.
Integration Errors
Make sure the integration meets all Home Assistant requirements and has valid .yaml files. If issues persist, check the logs and create an issue on the repository's GitHub page.
GitHub Rate Limiting
HACS relies on the GitHub API, which has rate limits. If you exceed requests, HACS operations may fail temporarily until the rate limit resets. If this happens frequently, you can set up a GitHub developer account with higher rates.
Conclusion
HACS opens up a world of possibilities with Home Assistant. It makes discovering and managing community-created integrations, apps, and themes incredibly easy.
The active development and open nature of Home Assistant is a large part of what makes it so powerful and flexible. HACS taps into that community knowledge to help you take your Home Assistant instance to the next level.
So get ready to supercharge your setup with all the great repositories available through HACS!
FAQs
Frequently Asked Questions
Does HACS work with Nabu Casa Cloud?
Yes, HACS works with both self-hosted and Nabu Casa Cloud instances of Home Assistant. The installation steps are the same.
What happens if I uninstall HACS?
Uninstalling HACS will remove the HACS integration and configuration. However, all the repositories you've installed will remain in your Home Assistant setup. You would have to manually uninstall each one that you no longer want.
Can I install HACS on Home Assistant Core?
HACS requires Home Assistant OS or Supervised to work properly. The permissions required for HACS are not available on Home Assistant Core.
Is HACS free?
Yes, HACS is completely free and open-source software. The developers accept donations to help support improving HACS.
How do I request a repository be added to HACS?
If you find a useful integration that isn't listed in HACS, you can request it be added through this form. The repository must meet certain quality standards to be included.