
Are you looking for help on how to install Home Assistant on a Synology NAS? If so, then this guide will show you how to get started. From downloading the necessary software to configuring settings, my guide will walk you through the process step by step so that you can easily set up Home Assistant on your Synology NAS.
What is Home Assistant?
Home Assistant is an open-source home automation platform that allows users to control and automate various devices and systems in their homes, such as lights, thermostats, security cameras, and more. It is designed to be easily extensible and can integrate with a wide variety of third-party services and devices, such as Amazon Alexa and Google Home.
Home Assistant allows users to have centralized control over their smart home devices, and it provides a web-based interface that can be accessed through a web browser or through a mobile app. It also includes automation features such as the ability to set schedules and create custom routines based on certain conditions, such as turning off lights when you leave the house or adjusting the thermostat when you're away.
One of the key features of Home Assistant is its flexibility, it can run on different operating systems and hardware platforms, including a Synology NAS. This allows users to use their existing NAS as a home automation hub, eliminating the need for an additional device and providing a cost-effective solution for home automation.
What is a Synology NAS?
A Synology NAS (Network Attached Storage) is a type of storage device that connects to a network and allows multiple users to store, share, and access files. It is essentially a mini-computer with its own operating system, that can run various applications and services, and it can be accessed remotely over the internet.
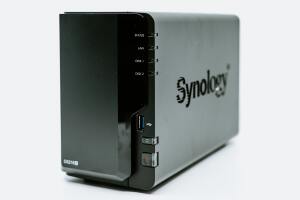 A Synology NAS
A Synology NAS typically includes one or more hard drives, and it can be configured as a RAID array to provide data redundancy and protection against drive failure. Synology NAS devices also include a variety of features such as file sharing, backup, and media streaming. They also provide an interface to manage the device, and it can be used for data backup, file sharing, and media streaming.
Synology NAS devices are popular among small businesses and home users, as they provide an easy and cost-effective way to store, share, and access files, and to run various services, such as VPN, mail server, etc.
Synology is a great manufacturer for your Home Assistant NAS as most newer models have the capability to run virtual machines and install docker containers, like Home Assistant, which expands the functionality of the device.
Can Home Assistant run on Synology NAS?
Home Assistant can run on a Synology NAS either as a container using Docker or as a virtual machine if your NAS is capable of running virtual machines. Home Assistant uses fewer resources in a container but you would lose out on the additional features provided by Home Assistant OS in a virtual machine.
Benefits of installing Home Assistant on a Synology NAS
Installing Home Assistant on a Synology NAS can provide several benefits:
Cost-effective solution: Using a Synology NAS as a home automation hub eliminates the need for an additional device, providing a cost-effective solution for home automation.
Centralized control: Home Assistant allows users to have centralized control over their smart home devices, and it provides a web-based interface that can be accessed through a web browser or a mobile app.
Easy integration: Home Assistant can integrate with a wide variety of third-party services and devices, such as Amazon Alexa and Google Home, allowing for a seamless and integrated smart home experience.
Flexibility: Home Assistant can run on different operating systems and hardware platforms, including a Synology NAS, which allows users to use their existing NAS as a home automation hub.
Additional features: Synology NAS devices come with many features such as file sharing, backup, and media streaming, which can be integrated with Home Assistant to create a comprehensive smart home solution.
More Storage: since the Home Assistant is running on a NAS, it can provide more storage space for the data and logs generated by the platform.
Power Saving: running Home Assistant on a NAS device can be more power-efficient than running it on a separate computer.
Remote access: With the ability to access the NAS remotely, the user can control the smart home devices from anywhere.
Overall, installing Home Assistant on a Synology NAS can provide a cost-effective, flexible, and comprehensive solution for home automation.
Checking the compatibility of your Synology NAS with Home Assistant
To check the compatibility of your Synology NAS with Home Assistant, you should check the following:
Operating System: Home Assistant can be installed on Synology NAS devices that run the DSM (DiskStation Manager) operating system version 6.0 or later. You can check the version of DSM on your NAS by logging into the web interface and going to the "Control Panel" and then "Info Center".
Hardware requirements: Home Assistant may require more resources than some older Synology NAS devices can provide. To check the hardware requirements, you can check the official Home Assistant website or the Synology website for the specific model of your NAS. You should check for the CPU and memory requirements, as well as the storage space.
Package availability: Home Assistant can be installed on a Synology NAS using the Docker package, which is available on the Synology Package Center. You should check if the Docker package is available for your NAS model and that the version is compatible with Home Assistant.
Networking: Home Assistant requires access to the internet, so you should make sure that your NAS is connected to the internet and that the firewall is configured to allow incoming connections.
By checking these points, you can confirm whether your Synology NAS is compatible with Home Assistant and if it meets the requirements. It's also recommended to check the official documentation and guides of Synology and Home Assistant to ensure compatibility and the specific instructions before proceeding with the installation.
Updating your Synology NAS to the latest firmware
Updating your Synology NAS to the latest firmware is important to ensure that the device is running the latest security updates and features. Here is a general overview of how to update the firmware on your Synology NAS:
Log in to the web interface of your Synology NAS. This can be done by opening a web browser and navigating to the IP address of your NAS.
Go to the "Control Panel" and then "Update & Restore" to check if there are any updates available.
If there are updates available, click on the "Update" button to start the update process.
Follow the on-screen instructions to complete the update process. This may take some time depending on the size of the update and the speed of your internet connection.
After the update process is complete, you will be prompted to reboot the device. Click on "OK" to reboot the device.
Once the device is rebooted, log in to the web interface again and check the version of the DSM to make sure that the update was successful.
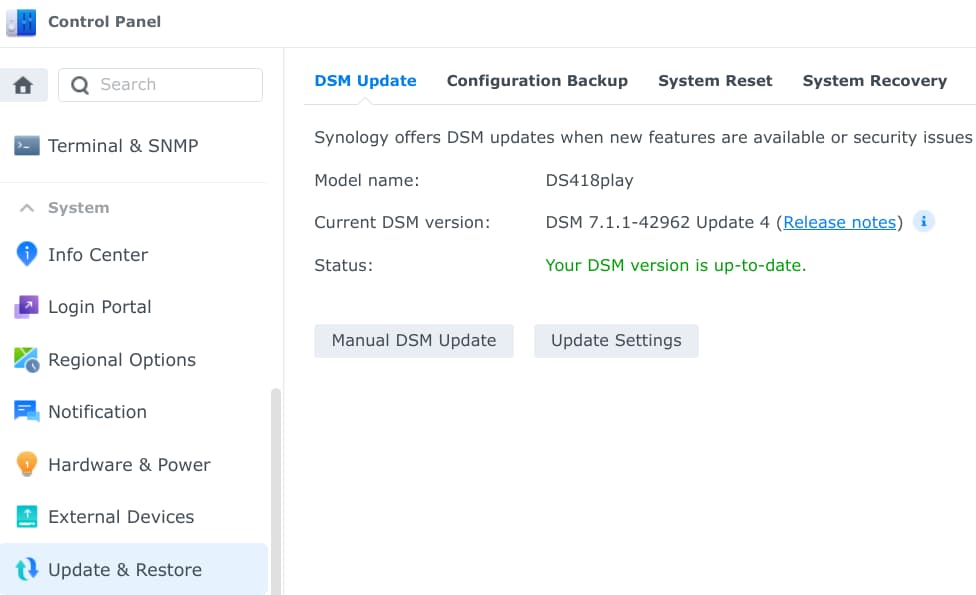 DSM Update section
The update process may vary depending on the model of the Synology NAS, and it's recommended to check the official documentation and guides to ensure compatibility and the specific instructions for the device. It's also recommended to back up the data before updating the firmware.
How To Install Home Assistant on your Synology NAS
1. Create a shared folder on your Synology NAS to store homeassistant files
Creating a shared folder on your Synology NAS to store Home Assistant files is an important step in the installation process, as it will allow Home Assistant to access and save its data and configuration files. Here is a general overview of how to create a shared folder on your Synology NAS:
Log in to the web interface of your Synology NAS. This can be done by opening a web browser and navigating to the IP address of your NAS.
Go to the "File Station" and click on "Create" and then "Create a new shared folder".
Enter a name for the shared folder, for example, "homeassistant" and choose the location of the folder.
In the "Permissions" tab, set the permissions for the folder. It's recommended to set the permissions to "Read/Write" for the user that will run Home Assistant.
Click on "Apply" to create the shared folder.
Once the shared folder is created, you can access it from the "File Station" and also from the command line.
By creating a shared folder, you are providing Home Assistant with a location to save its data and configuration files. This shared folder can also be used to backup the data and configuration files and to access them remotely. You can also use this shared folder to mount other storage devices and to access the files over the network.
2. Installing Docker (Container Manager) on your Synology NAS
Note: In DMS release 7.2+ the Docker package was renamed to Container Manager.
Here is a general overview of how to install Docker on your Synology NAS:
Log in to the web interface of your Synology NAS. This can be done by opening a web browser and navigating to the IP address of your NAS.
Go to the "Package Center" then search for Docker (if you are running DSM 7.2 or higher search for Container Manager instead) and select the Docker package.
Click on "Install" to start the installation process. Follow the on-screen instructions to complete the installation.
Once the installation is complete, you can go to the "Package Center" and click on Docker or Container Manager to open the Docker interface.
In the Docker interface, you can manage the Docker containers, images, and networks.
By installing Docker on your Synology NAS, you are providing a containerization platform for Home Assistant. This means that Home Assistant will run isolated from the host operating system and will have access to its resources, making it easier to install, manage, and update. It also allows you to run multiple instances of Home Assistant, each with its configurations. It's recommended to check the official documentation and guides of Synology and Docker to ensure compatibility and the specific instructions before proceeding with the installation and configuration.
3. Installing Home Assistant Container on your Synology NAS through Docker
Once you have installed Docker on your Synology NAS, you can proceed with installing Home Assistant Core as a Docker container.
Here is a general overview of how to install Home Assistant on your Synology NAS through Docker:
Log in to the web interface of your Synology NAS. This can be done by opening a web browser and navigating to the IP address of your NAS.
Click on the Docker icon from the desktop or the applications menu to open the Docker package.

In the Docker interface, click on the Registry button then search for "homeassistant" in the registry and select the official "homeassistant/home-assistant" image.
Click on Download and when prompted select the tag called "stable" to download the image to your Synology NAS.
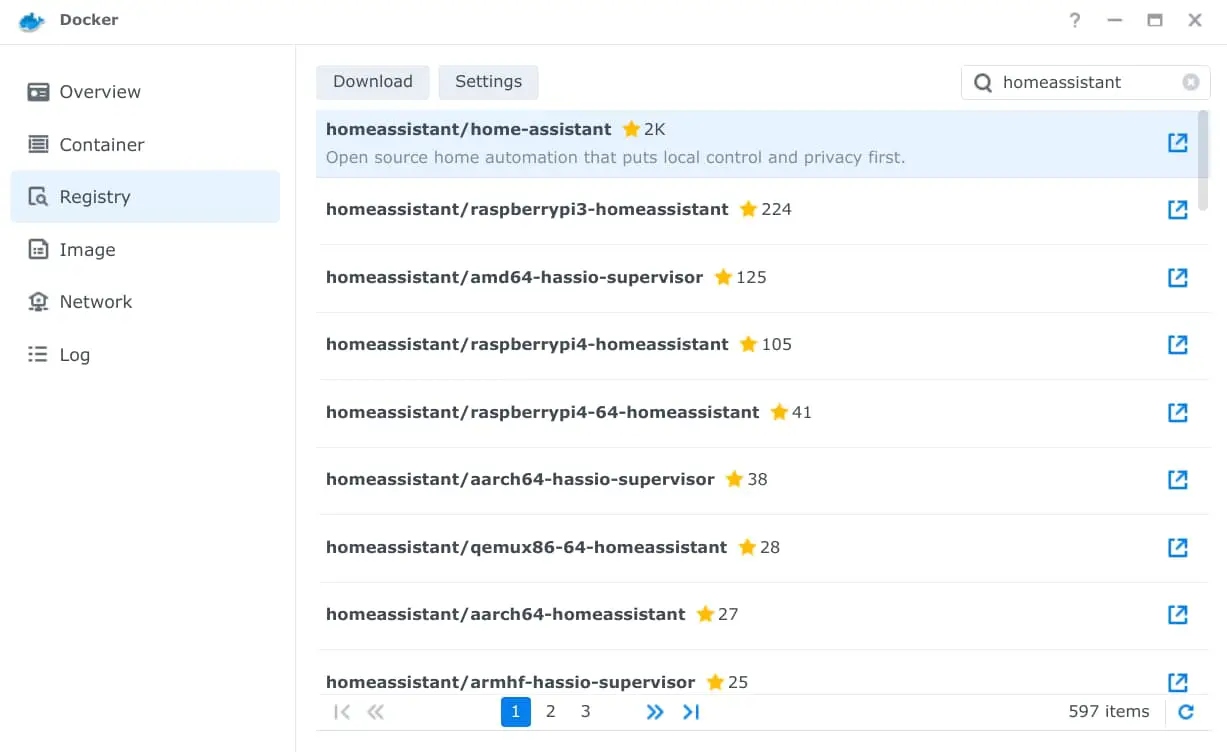 Home Assistant Synology image in Docker registry
Once the image is downloaded, click on the Container link then click Create to create a new container. Select the image named homeassistant/home-assistant and click Next.
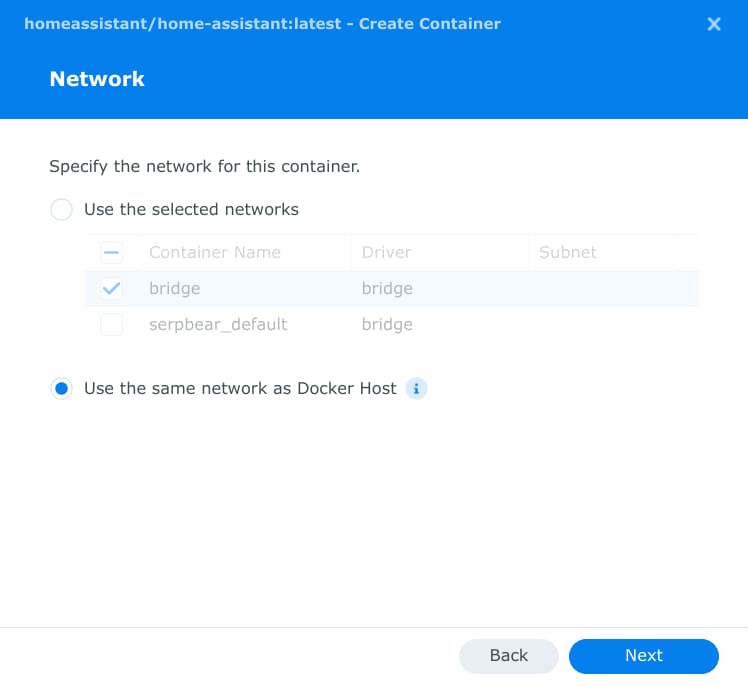
Click next to see the network settings, select Use the same network as the Docker host and click Next.
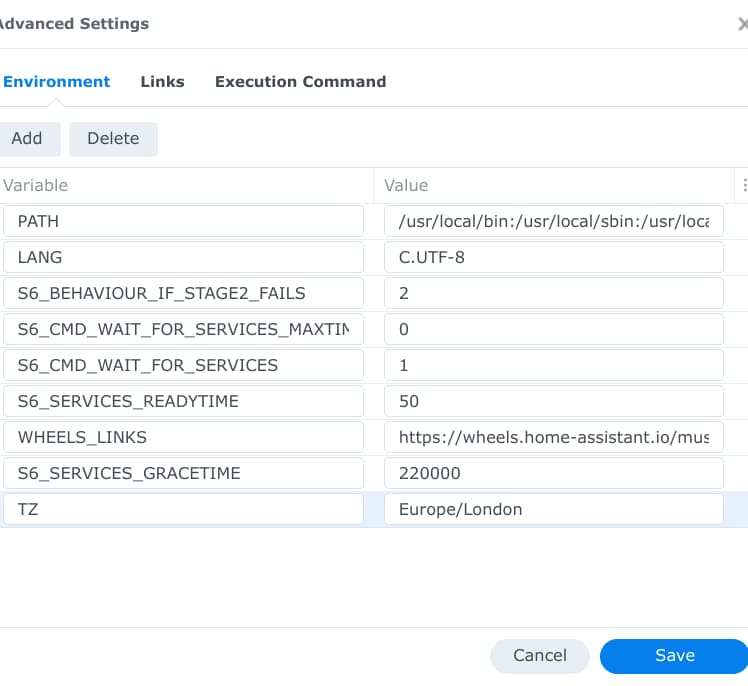
On the General settings page tick Enable auto-restart then click on Advanced Settings to bring up the environment variable list. Click Add then in the variable box enter TZ and in the value box enter your timezone e.g. Europe/London then click Save and then Next.
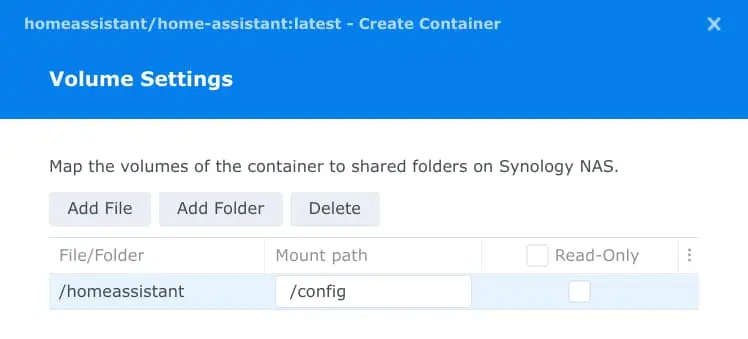
Click the Add Folder button and choose your Home Assistant shared folder we created earlier. In the mount path box, we need to enter /config then click Next.
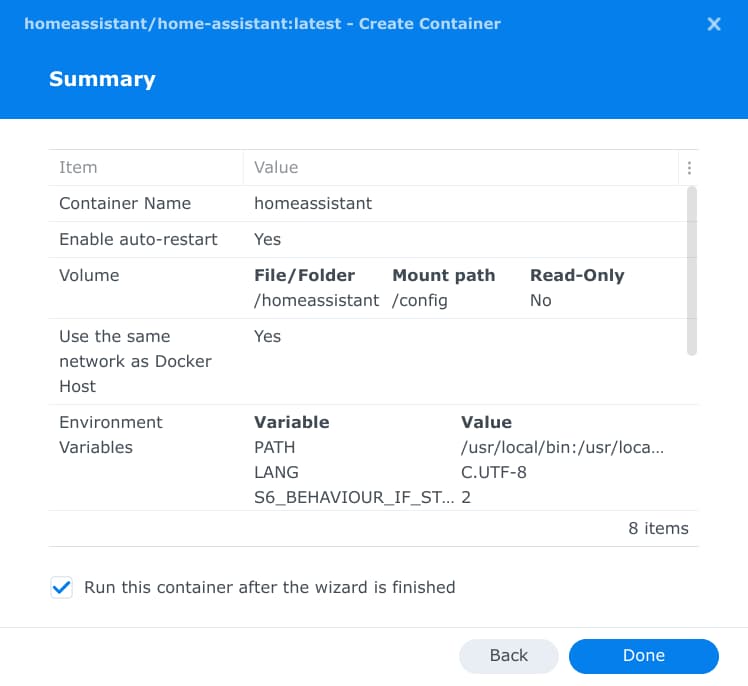
Review your settings and click Done.
That's it, your new Home Assistant docker container installation is complete and it will be accessible by browsing to http://your-nas-ip:8123
How to add USB devices to Home Assistant on Synology NAS
Connect to your NAS via Terminal and enter the command string below, replacing PATH_TO_USB_STICK and PATH_TO_CONFIG with your paths.
Your USB dongle would usually be something like /dev/ttyACM0 or /dev/ttyUSB0
sudo docker run --restart always -d --name homeassistant -v /PATH_TO_CONFIG:/config --device=/PATH_TO_USB_STICK -e TZ=Europe/London --net=host ghcr.io/home-assistant/home-assistant:stableThis command will restart Home Assistant with your dongle attached directly to the container.
How to Update the Home Assistant Docker Container
Open the Container Manager app on your NAS then go to the Image section.
Select “homeassistant/home-assistant” within the list and click on Update Available link then click the Update button.
A confirmation box will appear letting you know the container will be stopped and started during the update, click the Update button again to let the system download the newest image and complete the process.
Once the update has been completed, log back into Home Assistant to verify the update was successful.
Tips and best practices for using Home Assistant on a Synology NAS
Here are some tips and best practices for using Home Assistant on a Synology NAS:
Keep your Synology NAS and Home Assistant up-to-date with the latest firmware and software updates to ensure that the device is running the latest security updates and features, and to avoid compatibility issues.
Use a shared folder on your Synology NAS to store Home Assistant files, this will allow you to easily backup the data and configuration files and access them remotely.
Create regular backups of your Home Assistant configuration files and data, this will allow you to easily restore your configuration in case of any issues.
Use the Synology NAS to store media files and to use it as a media server, this will allow you to easily access your media files on different devices, and to use them on Home Assistant.
Use the Synology NAS as a VPN server, this will allow you to access your smart home devices and control them remotely and securely.
Use the Synology NAS to run other services, such as a mail server, and to integrate them with Home Assistant, this will allow you to create a comprehensive smart home solution.
Use the Synology NAS to run multiple instances of Home Assistant, with different configurations, this will allow you to test new features and configurations, and use them in different scenarios.
Use the Synology NAS to run other containers and applications, this will allow you to expand the functionality of the device and use it as a multi-purpose device.
By following these tips and best practices, you can ensure that your Home Assistant on Synology NAS is running smoothly, securely, and effectively.
FAQs
What port does Home Assistant use on Synology?
Home Assistant uses port 8123 by default.Can you use Home Assistant on Synology without Docker?
Yes, the alternative method is to create a virtual machine on your NAS by installing Home Assistant OS.Additional resources for troubleshooting and further customization
Here are some additional resources that you can use for troubleshooting and further customization of your Home Assistant on Synology NAS:
Home Assistant documentation: The official Home Assistant documentation is a great resource for troubleshooting and further customization. It includes detailed instructions, guides, and tutorials on how to use Home Assistant and how to integrate it with different devices and services.
Home Assistant community forum: The Home Assistant community forum is a great place to ask questions and to get help from other users. You can also share your own experiences and tips, and learn from others.
Synology documentation: The official Synology documentation is a great resource for troubleshooting and further customization of your Synology NAS. It includes detailed instructions, guides, and tutorials on how to use the Synology NAS, how to install and configure different packages, and how to use different features.
Synology community forum: The Synology community forum is a great place to ask questions and to get help from other users. You can also share your own experiences and tips, and learn from others.
By using these resources, you can find answers to your questions, learn new skills, and discover new ways to use and customize your Home Assistant on Synology NAS. It's recommended to check the official documentation and guides of Synology and Home Assistant to ensure compatibility and the specific instructions before proceeding with the troubleshooting and customization.