Home Assistant is a powerful home automation platform that allows users to control and automate various devices and services in their homes. With the increasing reliance on technology in our daily lives, it is crucial to ensure that our Home Assistant configuration data is backed up regularly to prevent any data loss in case of hardware failure or other issues.
In this article, we will walk you through the steps to backup your Home Assistant data to Google Drive. Google Drive offers an affordable and reliable cloud storage solution that allows you to securely store and access your data from anywhere with an internet connection. By following the steps outlined in this guide, you can ensure that your Home Assistant configuration data is safely backed up to Google Drive and easily restorable if needed. So, let's get started!
Importance of backing up Home Assistant data
Backing up Home Assistant data is essential for several reasons. Firstly, the Home Assistant configuration data contains all the settings and configurations that you have made to your home automation platform. If this data is lost due to hardware failure or other issues, it can take time and effort to set everything up again from scratch.
Additionally, Home Assistant data often includes sensitive information such as login credentials, device details, and automation scripts. Without a backup, this information could be lost or stolen, leading to privacy and security concerns.
Regularly backing up your Home Assistant data ensures that you have a copy of all your settings, configurations, and scripts. In the event of a failure or data loss, you can quickly restore your data and get your home automation platform up and running again without much hassle.
Why Backup Home Assistant to Google Drive?

Backing up Home Assistant data to Google Drive offers several benefits over other backup solutions.
Google Drive provides a secure and reliable cloud storage solution that allows you to store and access your data from anywhere with an internet connection. This means that your Home Assistant data is safe and accessible even if your hardware fails or is damaged.
Google Drive offers affordable storage options with generous storage limits. This means that you can backup your Home Assistant data without worrying about running out of storage space or incurring high costs.
Finally, Google Drive integrates seamlessly with Home Assistant through a third-party add-on, making it easy to set up and automate backups. This means that you can schedule regular backups without any manual intervention, ensuring that your data is always up to date.
How to backup Home Assistant to your Google Drive
To backup Home Assistant to a Google Drive you will need the Google Drive add-on for Home Assistant. This is an add-on I use myself and it works flawlessly.
The add-on allows you to customize the number of backups to keep (online and offline) and create backups or sync local backups on demand.
TODO: a step-by-step guide on how to install the google drive addon in Home Assistant OS.
Steps to enable Google Drive backups in Home Assistant
Add the Google Drive for Home Assistant repository to the add-on store. Inside Home Assistant go to Settings then Add-ons then click on the Add-on Store button. At the top right click the link with 3 dots and click on the Repositories link. Paste in the following URL and click add https://github.com/sabeechen/hassio-google-drive-backup
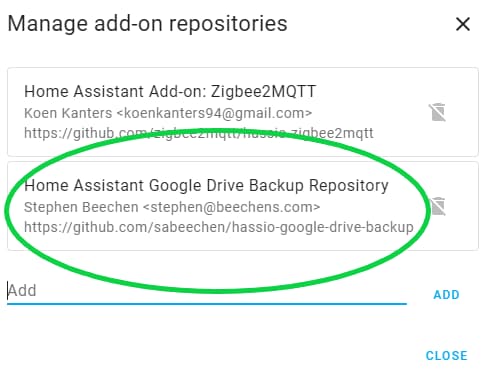
Exit out of the manage add-on repositories window and you should now see the add-on in the list. Click on it then click on the Install button.

Once the installation has been completed (usually only a couple of minutes) enable the option Start on boot and Watchdog. Optionally you can enable Show in sidebar if you would like a link in your sidebar for quick access to the dashboard for this add-on.
The installation of the Home Assistant Google Drive Backup add-on is now complete but we need to configure it, see the next section to learn how to complete this.
How to Configure Google Drive backup add-on in Home Assistant
By now you should have the add-on installed and not started just yet. Before you start the add-on there are some configuration steps you need to complete which we will go through now.
From the add-on screen click on the Configuration page from the top menu.
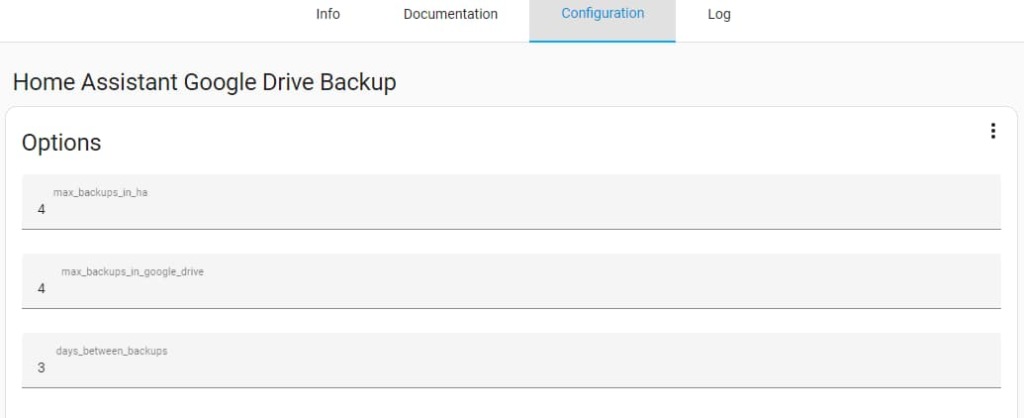 Google Drive addon configuration page
Change the values for max_backups_in_ha, max_backups_in_google_drive, and days_between_backups to your own requirements. The default values should be fine and these can be changed later if required.
Now go back to the Info screen and click Start. Once the add-on has started you can click on the Open Web UI link.
You need to now link your Google account to the add-on so that the backups can be automatically stored in your Google Drive.
Upon opening the web UI you will see a large blue button labeled Authenticate With Google Drive, click on this.
The link will take you to a Google sign-in page where you will need to authorize habackup.io to See, edit, create and delete only the specific Google Drive files that you use with this app. If you are happy with the permissions required click on Continue.
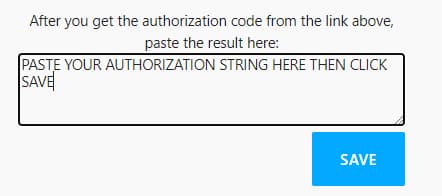
Copy the Authorization String and switch back to the Home Assistant tab in your web browser then paste the string and click Save
The add-on will now have the access required to create a new folder in the root of your Google Drive called Home Assistant Backups and any local backups will be immediately synchronized up to that folder.
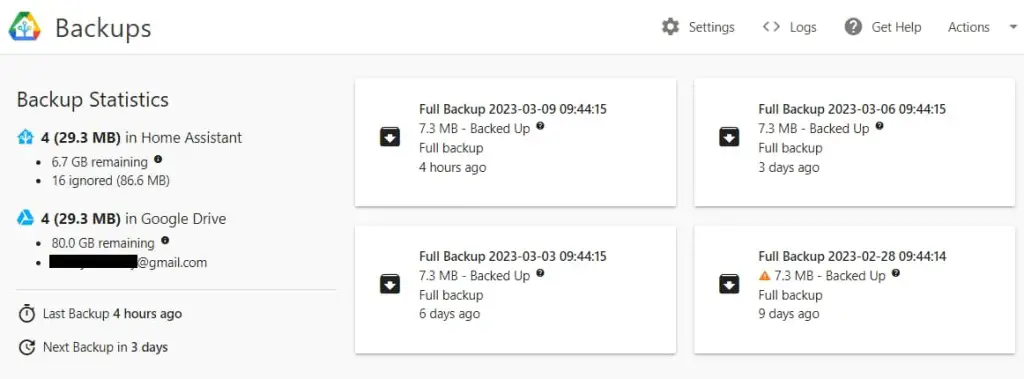 The add-on dashboard once setup has been completed
Setting up your Home Assistant backup schedule????
Manually triggering a backup - Click Actions then Backup Now
Verifying the backup in Google Drive - Go to https://drive.google.com/drive then look in the Home Assistant Backups folder to verify your backups have been uploaded.
Restoring from backup - From the add-on dashboard click on one of the backups and choose Restore
Downloading the backup file - From the add-on dashboard click on one of the backups and choose Download
B. Restoring the backup in Home Assistant - Go to Settings > System > Backups. Choose a backup by clicking on it then click on Restore. You can choose to restore a partial backup or a full backup.


