

Are you ready to transform your home into a smart haven? Look no further than Home Assistant—a powerful and versatile platform that allows you to automate various aspects of your home, making it more convenient and efficient.
In this comprehensive guide, I will walk you through the process of installing and configuring a Home Assistant Windows instance, enabling you to take full advantage of its incredible features and turn your ordinary house into a futuristic, intelligent dwelling.
Introduction to Home Assistant
Home Assistant is an open-source home automation platform that enables you to control and monitor various devices and services in your home. It serves as a centralized hub, allowing you to integrate smart devices from different manufacturers and manage them through a single interface. With Home Assistant, you can automate routines, create complex scenarios, and monitor the state of your home from anywhere in the world.
Does Home Assistant Work on Windows?
Home Assistant can not be installed directly onto a Windows operating system.
If you need to have an instance of Home Assistant on Windows the best option is to install Home Assistant OS in a virtual machine on your Windows device.
You may want to do this because you don't have any spare hardware to install Home Assistant OS directly on, or you would like a test instance of Home Assistant for experimenting with.
Later in this article, I will guide you step-by-step on installing a Home Assistant Windows VM and getting up and running with USB redirection to allow devices such as a Z-Wave dongle to communicate with Home Assistant.
The recommended Windows platform would be Windows Server 2016+, Windows 10/11 will work but these operating systems are not designed to run 24/7.
Benefits of Home Assistant for Windows Users
For Windows users, Home Assistant provides a seamless and user-friendly experience. Whether you are a tech enthusiast or a beginner, setting up Home Assistant on your Windows machine offers several advantages:
Compatibility: Home Assistant supports a wide range of devices and protocols, ensuring compatibility with your existing smart home ecosystem.
Flexibility: The platform is highly customizable, allowing you to tailor your smart home automation to your specific needs and preferences.
Community Support: Home Assistant has a vibrant community of users and developers who actively contribute to its development, ensuring continuous improvement and support.
Integration: Home Assistant integrates with popular platforms like Google Assistant, Amazon Alexa, and Apple HomeKit, providing a unified control experience across multiple devices and voice assistants.
Privacy and Security: With Home Assistant running locally on your Windows machine, you have full control over your data and can ensure the highest level of privacy and security.
System Requirements
Before installing Home Assistant, ensure that your Windows machine meets the following system requirements:
Operating System: Windows 10 (64-bit) or Windows Server 2016 (64-bit) or later versions.
Processor: Intel Pentium 4 / AMD Athlon 64 or newer with support for SSE3.
RAM: 8GB or higher.
Storage: At least 10GB of free disk space.
Network: A stable internet connection for initial setup and remote access.
Home Assistant Windows Installation Steps
You can create your Home Assistant VM in either Oracle VirtualBox, Hyper-V, or VMWare Workstation.
In this article, I will be using Oracle VirtualBox because it is completely free to use and is the most popular platform used by the Home Assistant community for Windows users.
Part 1 - Install Oracle VirtualBox
Oracle VirtualBox is a free and open-source virtualization software that allows users to run multiple operating systems on a single computer. It creates virtual machines that mimic the hardware and software of a physical computer.
Go to https://www.virtualbox.org/wiki/Downloads and click the download link for "Windows hosts" to download and run the exe installer.

Click next

Ensure VirtualBox USB Support and VirtualBox Networking are enabled and click next
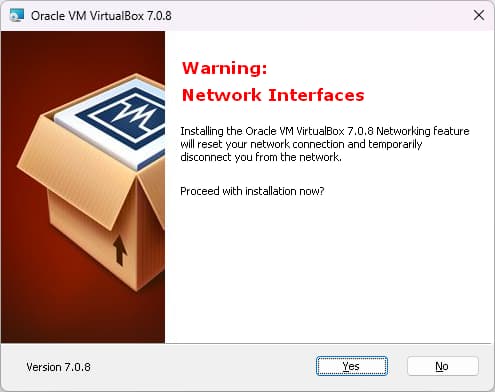
Click Yes to accept brief network interruption during the installation.

Click Yes to proceed with installation, we won't be using Python here so we can ignore the warning.


Click Install then Finish to complete the VirtualBox installation!
Part 2 - Install Home Assistant OS in a VirtualBox VM
To install Home Assistant on your Windows machine you will need to download a Home Assistant OS image and install this image in a VirtualBox virtual machine. Follow these steps to complete the process:
Visit the official Home Assistant website at https://www.home-assistant.io/installation/windows and click on the VirtualBox link to download the ZIP archive.
Extract the downloaded ZIP file then open up VirtualBox.
Click on New to begin creating a VM.

Give your new VM a name, set the VM type to Linux then the version to Linux 2.6 / 3.x / 4.x / 5.x (64-bit)

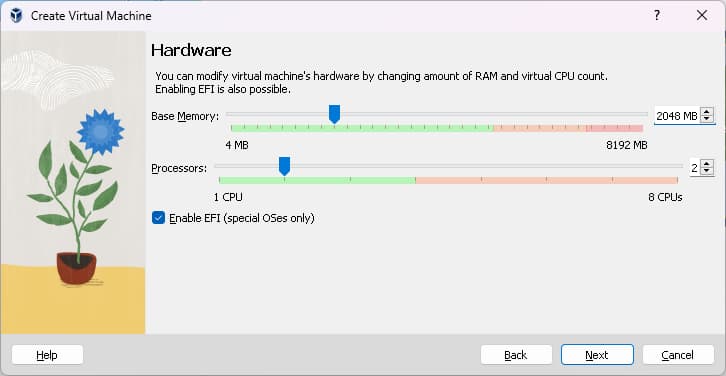
On the hardware screen give the VM at least 2GB of memory and tick the Enable EFI box.
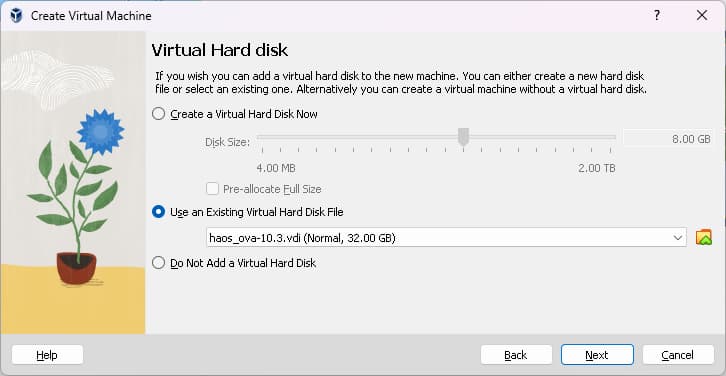
For the virtual hard disk we need to select Use an Existing Virtual Hard Disk File and browse to where you extracted the Home Assistant OS file from the ZIP file downloaded earlier.
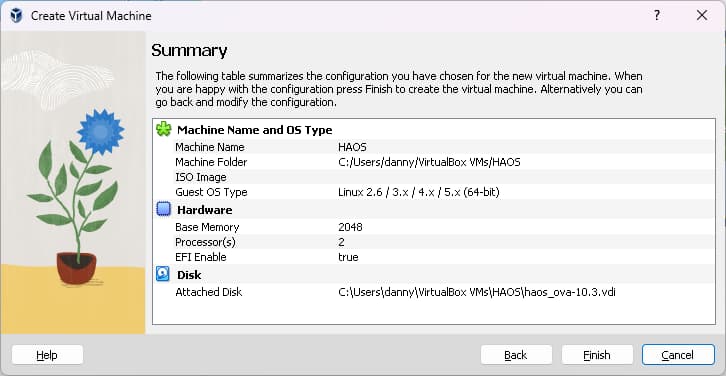
On the summary page, review your settings and click Finish.
From the main VirtualBox GUI right click on your VM and select Settings.
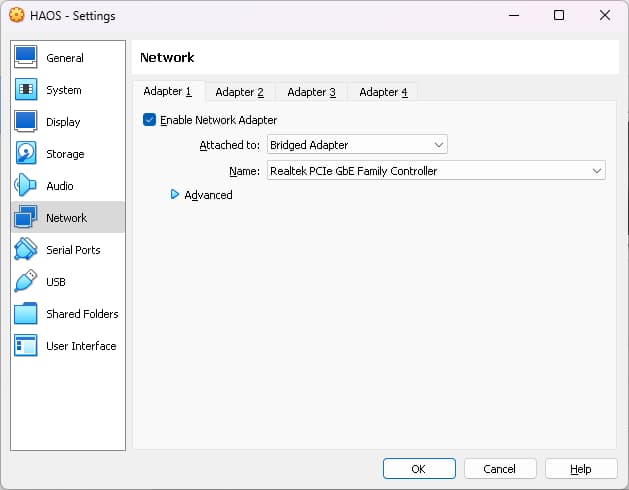
Go to the Network section and change the drop-down option to Bridged Adapter.
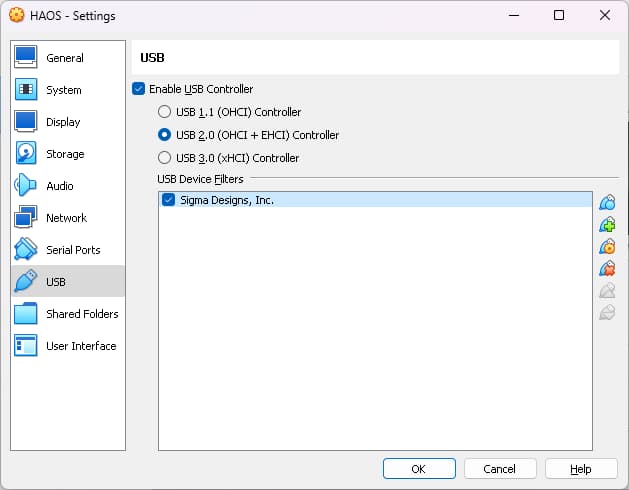
If you have a USB dongle such as a Bluetooth adapter, Zigbee or Z-Wave stick then go to the USB section and click the button on the right with the green plus sign then choose your adapter so that it appears in the USB Device Filters list.
In the screenshot below I have added an AEOTEC Z-Wave USB dongle, this shows up in the list as "Sigma Designs, Inc".
You can now close the settings page and start up your Home Assistant VM. Open the console to view the boot process and make a note of the IP address it picks up.
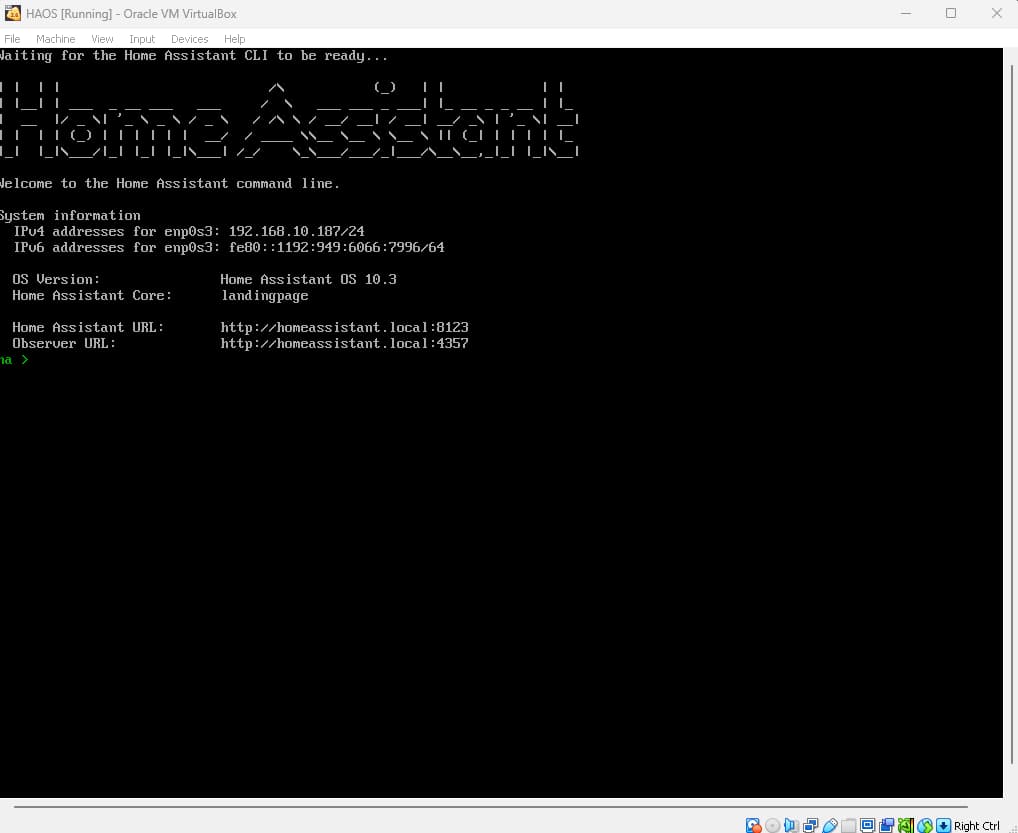 Home Assistant OS Console screen within VirtualBox VM
Configuring Home Assistant
After installing Home Assistant, you need to configure it to connect with your smart devices and services. The setup configuration is done through the web interface, which defines the entities, automations, and integrations within your setup. Here are the essential steps to configure Home Assistant:
Access the Home Assistant web interface by visiting "http://homeassistant.local:8123" or in my case I used the IP address seen in on the console screen which was 192.168.10.187 so I went to http://192.168.10.187:8123 in my web browser.
Create a user account and set up a secure password for your Home Assistant instance.
Follow the on-screen instructions to set up the basic configuration, including the location of your home, time zone, and user interface preferences.
Advanced: Customize the configuration.yaml file to add integrations, entities, and automations according to your smart home setup.
Integrating Devices and Services
One of the key strengths of Home Assistant is its ability to integrate a vast array of devices and services. Whether you have smart lights, thermostats, security cameras, or media players, Home Assistant offers extensive support. Here's how you can integrate devices and services into your Home Assistant setup:
Explore the Home Assistant website and community forums to discover the compatible devices and services available.
Install the necessary integrations for your devices and services. Home Assistant provides a straightforward process for adding integrations through the web interface.
Follow the integration-specific instructions to connect your devices to Home Assistant and configure their settings.
Once integrated, you can control and monitor these devices from the Home Assistant dashboard or through voice commands with supported voice assistants.
Customizing Your Home Assistant Windows VM Setup
With Home Assistant, you can personalize your smart home automation to suit your preferences. Here are a few customization options to consider:
Themes: Change the appearance of the Home Assistant user interface by applying different themes or creating your own.
Lovelace UI: Customize the dashboard layout and design using the powerful Lovelace UI editor. Add cards, arrange them, and create intuitive views of your smart home.
Automations: Create automation scripts to trigger actions based on specific events, time schedules, or sensor data. Make your home respond intelligently to your needs.
Scripts and Scenes: Define scripts and scenes to control multiple devices simultaneously with a single command or trigger.
Notifications: Set up notifications to receive alerts and updates from your smart home system, such as security alerts or reminders.
Automating Tasks with Home Assistant
Home Assistant excels at automating repetitive tasks and creating intricate routines. By leveraging the power of automation, you can streamline your daily routines and save time. Here are some examples of what you can achieve with Home Assistant:
Morning Routine: Automatically adjust the thermostat, turn on lights, and play your favourite music when you wake up.
Away Mode: Activate security features, turn off lights, and adjust the temperature when everyone leaves the house.
Movie Night: Dim the lights, close the blinds, and set the ambience for a cosy movie-watching experience.
Energy Optimization: Monitor energy consumption and automatically turn off devices when they're not in use to save energy.
Troubleshooting Common Issues
While Home Assistant strives to provide a smooth experience, you might encounter occasional challenges during the setup or operation. Here are some common issues you may encounter and their possible solutions:
Device Not Detected: Ensure that the device you're trying to integrate is compatible with Home Assistant and properly connected to your network.
Configuration Errors: Double-check your configuration files for any syntax errors or inconsistencies.
Platform Unavailability: Some integrations or services may experience temporary unavailability. Check the status of the service or integration on the Home Assistant website or community forums.
System Performance: If Home Assistant becomes sluggish or unresponsive, consider optimizing your setup by disabling unused integrations or adding more system resources.
Securing Your Home Assistant Installation
As your smart home becomes more connected, it's crucial to prioritize security. Here are some measures to enhance the security of your Home Assistant installation:
Strong Password: Use a strong and unique password for your Home Assistant account.
Two-Factor Authentication (2FA): Enable 2FA to add an extra layer of security to your login process.
Remote Access: If you require remote access to your Home Assistant instance, consider setting up a VPN or utilizing secure remote access methods.
Regular Updates: Keep Home Assistant and its integrations up to date with the latest security patches and updates.
Network Segmentation: Consider separating your smart home devices from your main network using VLANs or other network segmentation methods.
Expanding Your Smart Home Ecosystem
Home Assistant provides endless possibilities for expanding your smart home ecosystem. Here are some avenues to explore:
Additional Devices: Discover new smart devices and sensors to enhance the capabilities of your smart home setup.
Voice Assistants: Integrate voice assistants like Google Assistant, Amazon Alexa, or Apple Siri to control your smart home with voice commands.
Third-Party Integrations: Explore the Home Assistant community and third-party integrations to connect your smart home with popular platforms and services.
DIY Projects: Leverage Home Assistant's extensive support for DIY projects to build custom devices or automate unique aspects of your home.
Home Assistant Add-ons and Extensions
Home Assistant offers a vast library of add-ons and extensions that extend its functionality even further. These add-ons provide additional features, integrations, and utilities. Some popular add-ons include:
Node-RED: A visual flow-based programming tool that allows you to create complex automations and workflows.
MariaDB: A popular open-source relational database that can be used to store and analyze data from your Home Assistant installation.
Mosquitto: An MQTT broker that facilitates communication between devices and services in your smart home ecosystem.
Plex Media Server: A powerful media server that enables you to stream your media library to various devices within your home.
Enhancing the User Experience
To make the most of your Home Assistant experience, consider the following tips to enhance the user interface and usability:
Grouping Entities: Group related entities together for easier management and control.
Lovelace Dashboards: Create multiple dashboards tailored to different areas or purposes of your home.
Entity Cards: Utilize various entity cards to display relevant information and control options for your devices.
Custom Components: Explore the vast collection of custom components the Home Assistant community developed to add new functionalities and integrations.
Future Developments and Updates
Home Assistant is a rapidly evolving platform, constantly improving and adding new features. Stay updated with the latest developments by regularly visiting the Home Assistant website, community forums, and official announcements. By keeping your installation updated, you can benefit from new integrations, bug fixes, and performance enhancements.
Conclusion
Congratulations! You have completed the Home Assistant Windows Guide and are now equipped to transform your home into a smart and automated oasis.
Home Assistant empowers you to control and monitor your smart devices with ease, enhancing your quality of life and bringing convenience to your fingertips. Embrace the possibilities of home automation and enjoy the wonders of a fully connected and intelligent home.
Frequently Asked Questions
Can I install Home Assistant on a different operating system?
Yes, Home Assistant supports various operating systems, including Linux, macOS, and Docker containers. Refer to the official documentation for installation instructions specific to your desired platform.Can I use Home Assistant with voice assistants like Siri or Alexa?
Yes, Home Assistant integrates seamlessly with popular voice assistants such as Google Assistant, Amazon Alexa, and Apple Siri. You can control your smart home devices using voice commands through these platforms.Is Home Assistant compatible with all smart home devices?
Home Assistant supports a wide range of devices and protocols. However, compatibility may vary depending on the manufacturer and specific model of your devices. Consult the Home Assistant documentation and community forums to ensure compatibility before making a purchase.Can I access Home Assistant remotely when I'm away from home?
Yes, you can access your Home Assistant instance remotely by configuring remote access methods such as VPN or utilizing Home Assistant's built-in cloud-based remote access service called Nabu Casa. Follow the instructions provided by Home Assistant to set up remote access securely.Is Home Assistant free to use?
Yes, Home Assistant is an open-source platform released under the Apache License 2.0. It is free to download, use, and modify according to your needs.In conclusion, Home Assistant for Windows is a game-changer in the realm of home automation. By following this comprehensive guide, you are now equipped to embark on a journey of transforming your home into a futuristic and intelligent space. Enjoy the convenience, comfort, and security that Home Assistant brings, and explore the limitless possibilities of a smart home tailored to your needs and preferences. Start your automation adventure today!