
If you're looking for a way to turn on your computer remotely, the Home Assistant Wake on LAN (WoL) integration is a great solution.
By sending a signal from your Home Assistant server to a computer's network card, you can power on the computer from anywhere in the world. In this article, I'll take a closer look at how to set up Wake on LAN in Home Assistant.
Home Assistant can utilize Wake on LAN by configuring the Wake on LAN integration. First, you need to enable WOL on your computers then secondly, configure the Home Assistant integration via the configuration.yaml file for each device.
What is Wake on LAN?
Wake on LAN (WoL) is a technology that allows a computer to be turned on or awakened from a sleep state remotely over a network connection. This is useful in situations where a user needs to access their computer remotely but the computer is in a low-power state, such as in a standby or hibernation mode.
To use WoL, the computer's network interface card must support the feature, and the computer must be connected to a network that supports WoL. Additionally, the computer's BIOS settings must be configured to enable WoL. Once set up, the computer can be awakened by sending a special "magic packet" over the network to the computer's MAC address.
WoL is commonly used in enterprise environments to allow IT administrators to remotely manage and troubleshoot computers without requiring physical access. It can also be useful for home users who want to access their computers remotely without leaving them running all the time.
Why use Wake on LAN in Home Assistant?
There are a few reasons why you might want to use Wake on LAN in Home Assistant. For example:
You might want to turn on your computer remotely so that you can access files or run programs.
You might want to turn on your computer remotely so that you can perform updates or maintenance tasks.
You might want to turn on your computer remotely so that you can access your media collection or stream video to your TV.
I use WOL for my Home PC as I have RDP enabled on Windows so that I can remotely access my PC from my Chromebook. I don't want to leave my PC powered on 24/7 as the price of energy is really high in Europe right now.
Setting up Wake on LAN in Home Assistant
Setting up Wake on LAN in Home Assistant is relatively easy. Here are the steps you'll need to follow:
Step 1: Configure your computer
Before you can use Wake on LAN, you'll need to make sure that your computer is set up correctly. Here's how to do it:
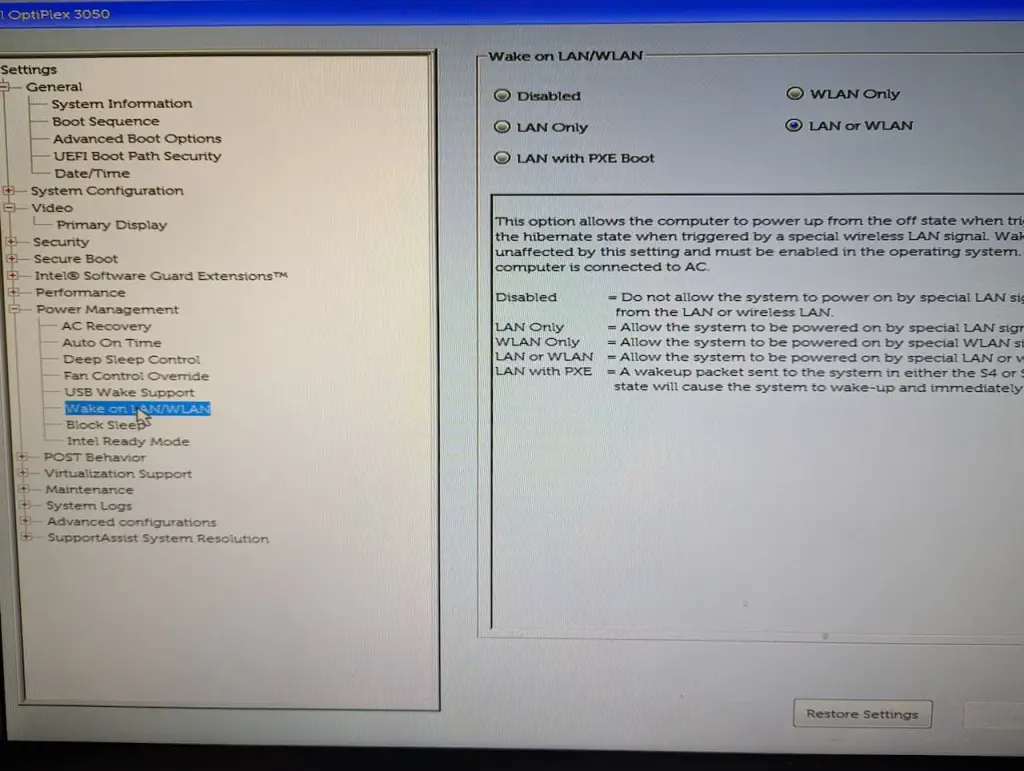
Enter your computer's BIOS and make sure that Wake on LAN is enabled. The location of this setting may vary depending on your computer's manufacturer and model.
Here is an example of where the Wake on LAN/WLAN settings is inside the Dell Optiplex BIOS.
Make sure that your computer's network card supports Wake on LAN. Most modern network cards do, but it's always a good idea to double-check.
Enable WOL from your NIC in Device Manager.
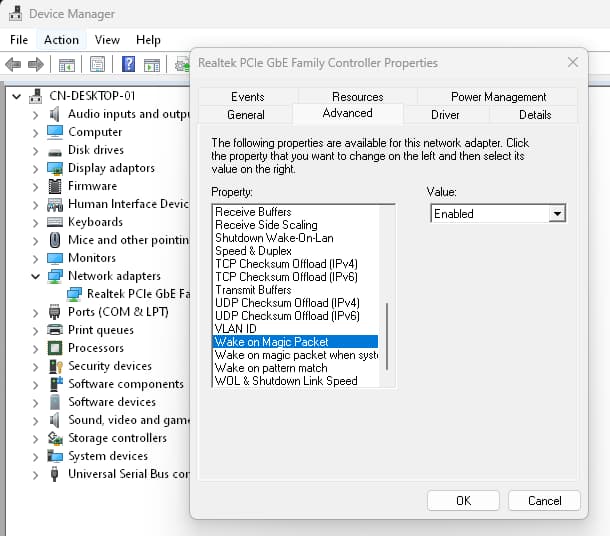 Wake on Magic Packet settings for Realtek PCIe controller
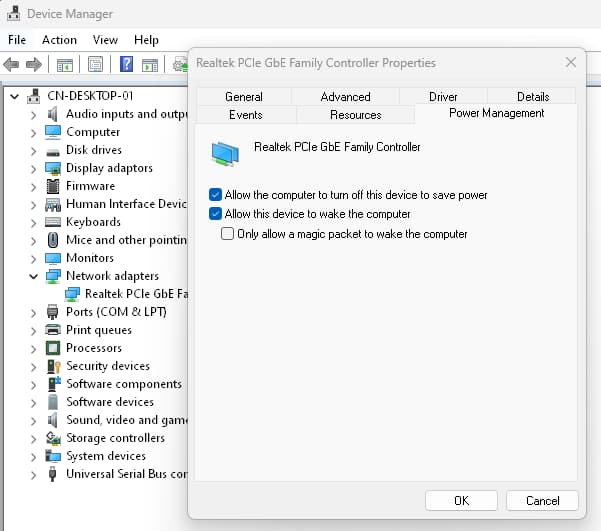 Enable Allow this device to wake the computer
Make sure that your computer is connected to your home network via an ethernet cable, or that you have a Wi-Fi adapter that supports WoL.
Step 2: Configure Home Assistant
Now that your computer is set up correctly, you can configure Home Assistant to send Wake on LAN packets by creating a new switch. Here's how to do it:
Open your Home Assistant configuration file (usually called "configuration.yaml").
Add the following lines to the end of the file:
wake_on_lan:
  - name: My Computer
    mac_address: 00:11:22:33:44:55
    host: 192.168.1.2
Replace "My Computer" with a name for your computer. This is just a label and does not have to match the real hostname.
Replace "00:11:22:33:44:55" with the MAC address of your computer's network card.
To find your MAC address from Windows open Command Prompt and type ipconfig /all then look for the line "Physical Address". The address will be formatted with hyphens (00-15-5D-0C-01-47). Copy this address and change the hyphens to colons (00:15:5D:0C:01:47)
Replace "192.168.1.2" with the IP address of your computer. The IP address will be labeled as "IPv4 Address" in ipconfig.
Save the file and restart Home Assistant.

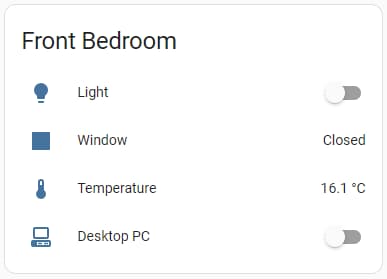
After you have restarted Home Assistant you will have a new switch which can be found in the entities section.

This switch can be added to your dashboard entity cards as illustrated below.
Step 3: Manually send a wake on LAN signal
To test Wake on LAN, try turning on your computer from Home Assistant. Here's how to do it:
Open the Home Assistant web interface.
Click on "Developer Tools" then "Services" in the sidebar.
Choose "wake_on_lan.send_magic_packet" from the list of services.
Fill in the following fields:
MAC Address: the MAC address you provided in the configuration file.Click "Call Service".
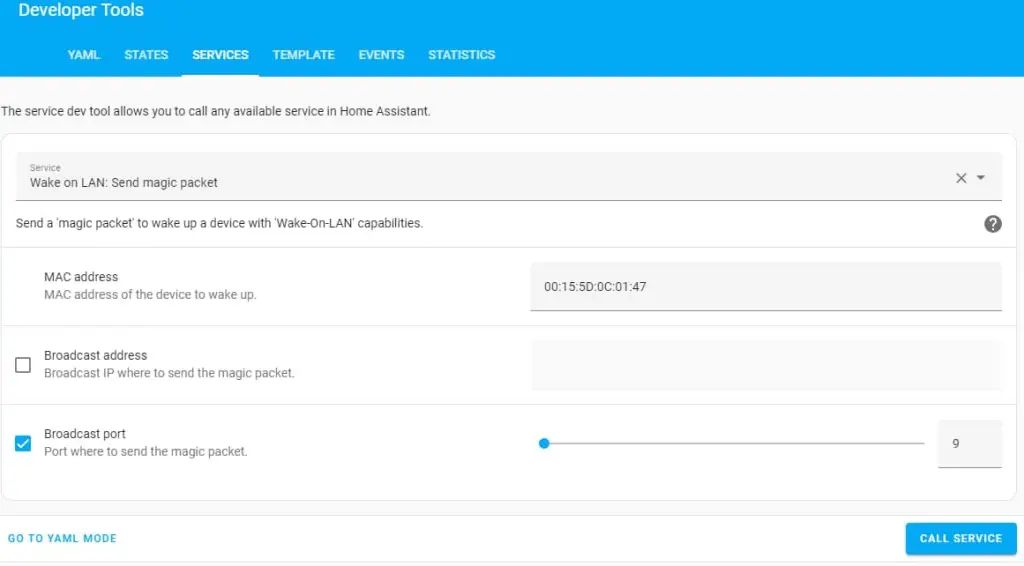 Home Assistant Wake on LAN Service tool
If everything is set up correctly, your computer should turn on within a few seconds.
How to Turn Off Computer in Home Assistant
Right now, the switch you have just created can only be used to turn on your computer.
If you need to also turn off the computer when it is already powered on then we need to add some extra configuration to the switch and install an addon to allow Home Assistant to do this.
The following steps are specifically for Windows devices only.
Go to the Home Assistant addon store and install the RPC Shutdown addon.

Once the addon has been installed, start it then go to the configuration page by using the link at the top of the screen.
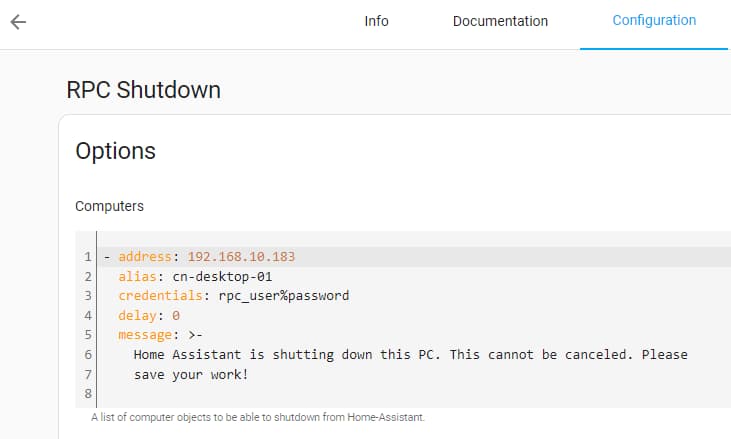
There will be some default configuration, simply replace the IP address, provide an alias, and replace the default username and password with valid credentials of the target Windows device. Once complete click save.
I would suggest creating a new Windows user dedicated to this task. My Windows 11 PC has a user called "rpc_user" as seen in the screenshot below.
Now go back to the switch you created in your configuration.yaml file and add the following code at the end of the switch section:
    turn_off:
      service: hassio.addon_stdin
      data:
        addon: core_rpc_shutdown
        input: cn-desktop-01
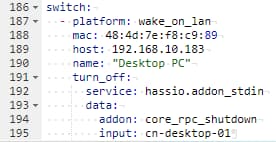
Note: The input: line needs to match the alias you provided in the RPC Shutdown addon configuration.
Once completed your switch configuration should look something like this.
Restart Home Assistant to apply the updated switch configuration.
Troubleshooting Wake on LAN in Home Assistant
If Wake on LAN isn't working correctly in Home Assistant, there are a few things you can try:
Make sure that your computer is set up correctly, as described in Step 1 above.
Make sure that your Home Assistant configuration file is correct, as described in Step 2 above.
Test Wake on LAN using a different tool. You can download NirSoft WakeMeOnLan from a second PC and use it to test that your computer correctly responds to WOL magic packets.
Ensure the letters in the MAC address are in lowercase for the switch.
If your computer is powered on but the switch is set in the off state then Home Assistant is not receiving a ping response from your computer. To fix this you will need to allow ping (icmp) through Windows Defender Firewall.
In Windows Defender Firewall the setting you need to allow is called Windows Core Diagnostics.
Conclusion
Using the Home Assistant Wake on LAN integration is a great way to turn on your computer remotely, and it's easy to set up. By following the steps outlined in this article, you should be able to get Wake on LAN up and running in no time.


